Capturing the Majesty of Yosemite: A Photographer's Journey

Capturing the Majesty of Yosemite: My 3-Day Photography Journey

Granite Chief with Lupin in the Foreground

From June 17th to 19th, 2024, I embarked on a photography-focused adventure in Yosemite National Park. Armed with my Fujifilm X-T5 and X-S20, I set out to capture the park's stunning landscapes using the Fuji XF 10-24mm for wide-angle shots and the Fuji XF 70-300mm for zoomed-in details. Michael Frye's "Yosemite Photo Guide" was my trusted companion, guiding me to the best spots at the optimal times. Here’s a detailed account of my itinerary and experiences.

Day 1 - Arrival and Sunset Photography

After a 4 hour drive from San Francisco and another hour drive once inside the park, I checked into my rustic canvas tent cabin at Curry Village, eager to start my photographic journey. Despite the unheated tents and the low 40s temperatures at night, the accommodations were comfortable and provided easy access to the park's key locations.

Curry Village Tents - as seen from Glacier Point

I enjoyed a Pizza from the Pizza Deck and Beer from Bar 1899 at the dining pavilion, prepping myself for the evening shoot.

### 6:30 PM - Sunset Photography at Glacier Point

Driving to Glacier Point was a breathtaking experience in itself, and the one-hour journey flew by. As the golden hour approached, I set up my gear to capture the mesmerizing views of Half Dome and the Yosemite Valley bathed in the warm light of the setting sun. By 8:30 PM, I returned to Curry Village, eagerly reviewing the day’s shots and backing them up before calling it a night.

View of Half Dome from Glacier Point

Half Dome

Day 2: Sunrise, Cycling, and Iconic Views

### 4:30 AM - Early Moring Photography at Taft Point

Despite the cold and early hour, being alone at Taft Point for sunrise was surreal. The early light striking El Capitan made for some of my favorite shots of the trip. Taft Point is about a mile hike from the parking lot.

Taft Point

Taft Point

Taft Point

Wildflowers on the way back from Taft Point

### 9:30 AM - Breakfast at Curry Village Coffee Corner

A light breakfast and a strong coffee fueled me for the day ahead.

### 9:00 AM - Photography-Related Cycling in Yosemite Valley

Cycling through the valley floor, I captured iconic landmarks like El Capitan, Bridalveil Fall, and Yosemite Falls. The X-T5 with the 10-24mm lens was perfect for wide-angle shots of these grand landscapes.

### 12:00 PM - Lunch at the Degan’s Kitchen

### 5:30 PM - Dinner at Curry Village Pizza Deck

Pizza and a local microbrew were the perfect prelude to another sunset shoot.

### 6:30 PM - Sunset Photography at Tunnel View

Although high-level smoke from nearby wildfires obscured the view slightly, capturing El Capitan and Half Dome from Tunnel View was still an unforgettable experience. Along the drive, I also photographed Bridalveil Falls.

Bridalveil Falls

Tunnel View

Tunnel View Blue Hour

Day 3: Early Morning Magic and Departure

### 6:00 AM - Breakfast at Curry Village Coffee Corner

A hearty breakfast was essential before packing up.

### 7:00 AM - Last bits of Photography on drive out

Reflections on an Unforgettable Journey

Yosemite is a photographer’s paradise. Each location offers unique challenges and rewards, making every shot a cherished memory. The combination of the right gear, the indispensable "Yosemite Photo Guide," and the park's natural beauty made this trip one for the books. Whether you’re a seasoned pro or an amateur, Yosemite will inspire and challenge you in the best ways possible. I can’t wait to return and discover even more of its hidden gems.

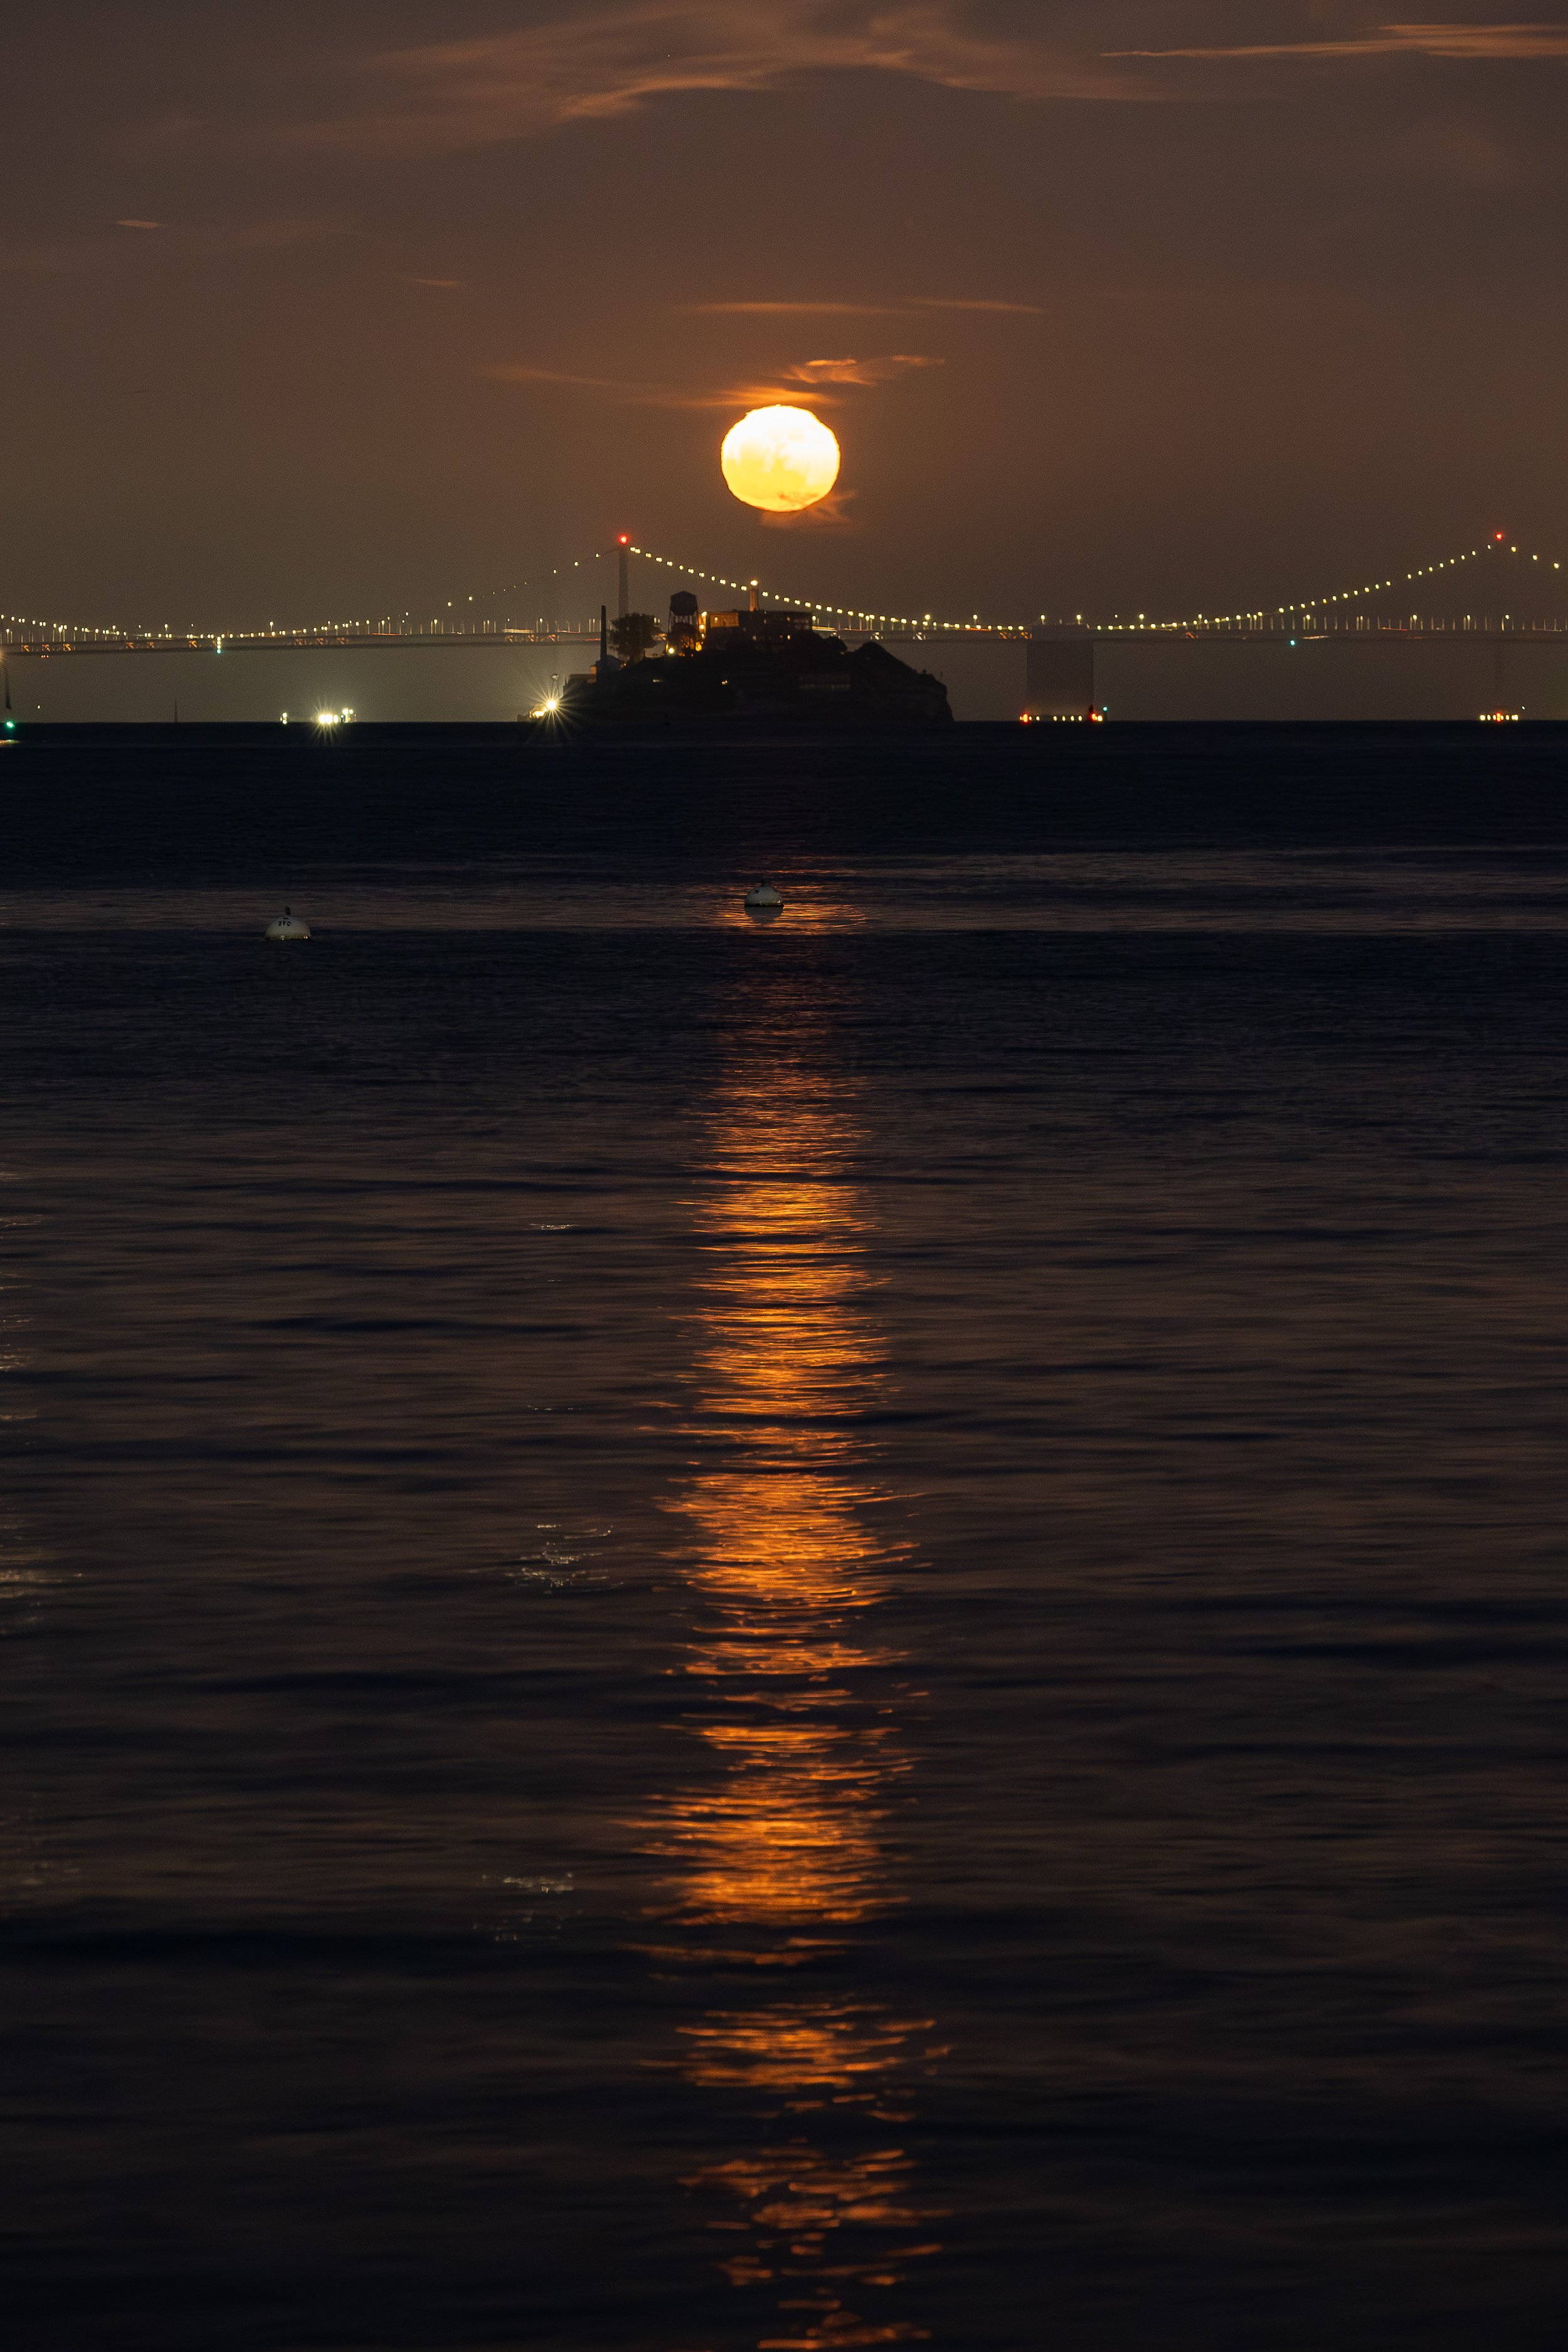
Capturing the Full Moon Rising Over Alcatraz from Sausalito


On the evening of May 23rd, 2024, I joined a my usual MeetUp photography group to capture the full moon rising over Alcatraz. With my Fuji X-T3 and the XF 100-400mm lens in hand, I headed to Sausalito, CA, from San Francisco.

Flower Moonrise over Alcatraz Island

Full Flower Moonrise over Sausalito (Fuji XT-3, Fuji XF 100-400)

The moonrise was expected around 9:15 PM, presenting a unique set of challenges. The bright full moon contrasted sharply with the dark waters of the San Francisco Bay and the dimly lit Alcatraz Island. Balancing these lighting conditions was tricky and I’m continuously trying to improve my technique.

Full Flower Moonrise over Sausalito (Fuji XT-3, Fuji XF 100-400)

I relied on the Fuji XF 100-400mm lens for its impressive reach. This combination allowed me to frame the moon and Alcatraz just right, capturing the scene successfully.

Before the main event, I took the opportunity to explore the Sausalito Yacht Harbor with my Fuji X100VI. This compact yet powerful camera is perfect for spontaneous shots. The evening light cast a beautiful glow over the harbor, making for some great shots of the yachts and the serene water. It was a tranquil prelude to the night's main attraction.

Sailboat Masts (Fuji X100VI)

Boat Storage Lockers (Fuji X100VI)

As the moon began to rise, it was truly a sight to behold. The bright, full moon ascending over the iconic silhouette of Alcatraz was mesmerizing. The darkness of the bay and the sparse lights on the island created a dramatic contrast, highlighting the moon's brilliance. Capturing this required careful adjustments to exposure settings to balance the moon's brightness with the surrounding darkness.

Despite the challenging conditions, the images turned out to my satisfaction. The combination of the long reach of the XF 100-400mm lens and the X-T3's excellent performance in low light allowed me to capture the moon in crisp detail, with Alcatraz standing quietly below it.

The evening concluded with a sense of satisfaction and a collection of nice images

Sunset behind Mt. Tam with Sailboat Masts in the Foreground (Fuji XT-3, Fuji XF 100-400)

Exploring Mendocino: A Photographic Journey

May 18th to 20th, 2024, was a weekend my wife and I will cherish. We decided to escape San Francisco and head north to the picturesque town of Mendocino, CA. Armed with my Fujifilm XT-5 and the versatile XF 16-80mm lens, we set out to capture the beauty of this coastal town.

The town of Mendocino

Mendocino is a photographer’s paradise. The quaint town, with its charming Victorian homes and stunning coastal views, offers endless opportunities for capturing breathtaking images. We spent our first day wandering through the streets, snapping photos of the unique architecture and the vibrant spring flowers in full bloom. The mostly clear, cool weather provided perfect lighting conditions, and the gentle breeze added a dynamic element to my shots.

One of many water towers in Mendocino.

Golden Hour in Mendocino

One of the highlights of our trip was a scenic drive along Highway 1, stretching from Mendocino down to Point Arena. This stretch of road is renowned for its dramatic ocean vistas and rugged cliffs. We made several stops along the way to capture the sweeping views and the waves crashing against the shore. The clear skies allowed for stunning panoramas, while the cool, windy conditions added a sense of adventure to our journey.

Dramatic coastline along Hwy 1

Dramatic coastline along Hwy 1

During our journey, we spent an hour in the small town of Point Arena for lunch. After lunch, I took the opportunity to capture some photographs of the town. The historic buildings and colorful storefronts provided wonderful subjects.

Point Arena Mural with California Poppies in Front

Downtown Point Arena

Our drive culminated in a visit to the iconic Point Arena Lighthouse. Standing tall against the backdrop of the Pacific Ocean, the lighthouse is a beacon of history and beauty. We took a guided tour to learn about its rich heritage and climbed to the top for a panoramic view that was nothing short of spectacular. The wind at the top was strong, so we couldn’t go outside, but it only added to the experience of capturing the ocean and rugged coastline from such a unique vantage point.

Point Arean Lighthouse

Point Arena Lighthouse Stairs

View from the Point Arena Lighthouse

Throughout our weekend, my camera and lens combination proved to be the perfect companion. The versatility of the 16-80mm lens allowed me to switch seamlessly between wide-angle landscapes and detailed close-ups, ensuring that I could capture every moment just as I envisioned. From the charming streets of Mendocino to the awe-inspiring views from the Point Arena Lighthouse, every shot was a testament to the beauty of Northern California’s coast.

Downtown Mendocino

Our weekend in Mendocino was a perfect blend of relaxation and adventure. The stunning scenery, combined with the joy of exploring it with my wife, made for an unforgettable experience. If you’re a photography enthusiast looking for your next destination, I highly recommend Mendocino and the surrounding areas. The clear, cool weather and the dramatic landscapes provide endless opportunities for creating stunning images.

Town of Mendocino

A Ferry Ride to Treasure Island

I pass through Treasure Island all the time. Mostly it’s just driving through a 5 lane cement tunnel but every now and then, I take an offramp to capture some photos since there are some great views of the San Francisco skyline from there. Just last week, I decided to leave the car at home and instead take the 10 minute ferry ride over from the Ferry Building.

The ferry is a no brainer and at $5, I’ll for sure be doing it again.

Upon arrival to Treasure Island, I met up with a few folks from the MeetUp Group “Friends of Photography” lead by award winning photographer, Frederic Larson

San Francisco Skyline shot with the Fuji X-S20 and the XF 16-80 lens.

Already we could see the crescent moon above the city but we could also see haze right along the horizon. By the way, I was shooting with the Fuji X-T3 with the great range of the XF 70-300 as well as an X-S20 with an XF 16-80 lens.

San Francisco Skyline shot with the Fuji X-S20 and the XF 16-80 lens.

I pretty much alway shoot with the “Auto ISO” option somewhere between 100 and 6400. I realize for some reason that i forgot to change the max ISO on the X-S20 to 6400 so of course the camera took advantage of the max - 12800. Hello grain!

San Francisco Skyline shot with the Fuji X-T3 and the XF 70-300 lens.

I think the shot above might have been my favorite. The moon is pretty prominent and it’s pretty well centered in the photo. Have a look below at some others as the moon began to set ultimately into the haze.

San Francisco Skyline shot with the Fuji X-T3 and the XF 70-300 lens.

San Francisco Skyline shot with the Fuji X-T3 and the XF 70-300 lens.

Ok, maybe the one above was my favorite. What do you all think?

A Vase of Roses

Last weekend, I wanted to try out a few new functions within the Fuji cameras that I had heard of for some time, but never tried - Focus Stacking.

You need several items to pull off focus stacking, the camera, the lens, a tripod then the software to process the images.

I used my Fuji X-T2 and set the shutter to Electronic. This avoids any unnecessary camera shake. It’s pretty east to configure within the Drive settings of the camera but it took a little trial and error to get the shot (or shots) I was looking for. Once I had my series of shots, I imported them into Photoshop for processing. I still have more to learn but thought this first try was a successful one.

The lens I used is the brilliant XF80 Macro Lens.

This was a series of 20 shots combined in Photoshop

This was a series of 20 shots combined in Photoshop

This was a series of 100 shots although I only used 70 since I didn’t want to back wall in focus

This was a series of 100 shots although I only used 70 since I didn’t want to back wall in focus

This was a series of 20 shots

This was a series of 20 shots

This was a series of 20 shots

This was a series of 20 shots

Los Angeles

I was down in Los Angles recently with my wife. I've been looking forward to this trip for quite a while as this was the first time that I had some time to visit some interesting places and take some pictures along the wayOf course no trip would be complete without my Fuji XT1 and X100s. For the XT1, I carried the perfect travel lens - the XF18-135mmF3.5-5.6 R LM OIS WR. Like any "travel lens" there are some compromises but the benefits far outweigh the disadvantages. 

My wife was in meetings the first two days so I decided to take in a trip to the USC campus to see the Space Shuttle Endeavour (yes, It's spelled the proper British way, not the American). I saw the Shuttle fly over San Francisco some years earlier but I've yet to see it in person on the ground. If you have the chance, be sure and check it out at the California Science Center. 

Later in the afternoon I drove up to Malibu to try to catch some sunset shots. Not being familiar with the LA area, I didn't exactly know where I was going to drop my tripod but I ended up choosing the perfect spot at the Malibu Pier

The next day, I went to the Huntington Library in San Marino. I've been there a long time ago but I forgot how beautiful this place is. I particularly found the Chinese and Japanese gardens beautiful. 

Day 3 my wife was finally free of meetings so we decided to take in a downtown LA walking tour put on by the LA Conservancy. I can't recommend one of these tours enough. We opted for the Historic Downtown Walking Tour. The tour included a number of historic downtown buildings including the Bradbury Building, the Los Angeles Central Library and the Grand Central Market.

I'm looking forward to the next time I visit LA. There are a number of photographic opportunities in the area and I only managed to scratch the surface on this trip. 

Space Shuttle Endeavour, Fuji XT-1

Space Shuttle Endeavour, Fuji XT-1

Space Shuttle Endeavour, Fuji XT-1. Nice to have a wide angle lens on this shot.

Space Shuttle Endeavour, Fuji XT-1. Nice to have a wide angle lens on this shot.

Malibu Pier, Fuji X100S

Malibu Pier, Fuji X100S

Malibu Pier, Fuji XT-1

Malibu Pier, Fuji XT-1

Huntington Library, Chinese Garden, Fuji XT-1

Huntington Library, Chinese Garden, Fuji XT-1

Downtown LA Walking Tour, Fuji X100S

Downtown LA Walking Tour, Fuji X100S

Downtown LA Walking Tour, Bradbury Building, Fuji X100S

Downtown LA Walking Tour, Bradbury Building, Fuji X100S

Los Angles Public Library as taken from Bunker Hill. This was shot with the Fujifilm XF 18-135mm f/3.5-5.6 R LM OIS WR Lens. A fantastic "travel lens" that lived up to the billing.

Los Angles Public Library as taken from Bunker Hill. This was shot with the Fujifilm XF 18-135mm f/3.5-5.6 R LM OIS WR Lens. A fantastic "travel lens" that lived up to the billing.

Holidays in Northern Arizona

As is typical of this time of year, my wife and I head to Northern Arizona for the holidays. As my hometown of Flagstaff sits at 7000 feet, it's not unusual to have snow but this time we had nearly a foot. This made for some fantastic winter photographic opportunities - particularly in Sedona Arizona where I was able to shoot some long exposure shots along Oak Creek. 


Oak Creek River

Oak Creek River

Oak Creek River

Oak Creek River

We also spend some time up in the Petrified Forest National Park. This place is truly a surreal landscape with beautiful views to be had throughout the park. It's a "must visit" if you are in Northern Arizona. 


Painted Desert

Painted Desert

Petrified Wood

Petrified Wood

Painted Desert

Painted Desert

Finally, we had a day down in Sedona Arizona. I was hoping for some high clouds so I could capture a decent sunset - and I wasn't disappointed. 


The red rocks of Sedona Arizona

The red rocks of Sedona Arizona

Photography in Antarctica

Before traveling to Antarctica over the 2013 Christmas Holiday, I wanted to know a lot about photography in Antarctica. Sure, I knew there would be a lot of beautiful wildlife and scenery to shoot but I didn't know exactly what conditions I was going to be in nor what types of cameras or gear I should bring. For instance, should I bring one camera or two. If I bring two, what kinds of lenses should I bring? How do I keep the cameras protected? Do I need a dry bag? What kind of camera bag should I get.  I mean the questions go on and yet, I only found a few websites that truly answered my questions.

Well look no further folks, I'll tell you exactly what you need to know. At least I'll tell you exactly what I wished I had known before I went. I will tell you, that everyone is different so what my recommendations are, may not apply to you but I think I can give you a pretty good idea without having to carry too much bulk half way across the world. So let's begin. 

Antarctica 2013-252.jpg

First, let me tell you a bit about me. I'm an amateur photographer through and through. I've made a few bucks here and there on photo's but if I relied on income from photography - I could never afford to travel to Antarctica - much less anywhere else. That said, I'd classify myself as an "advanced amateur" who likes to shoot often and post most of my work online. My main area of focus is street and landscape photography. Since I live in San Francisco, most of my work is inspired by, and come from, this area - not a bad place to shoot if you asked me. In terms of my hardware, I have a DSLR's (a Canon 6D), two Fuji mirror-less cameras (X100s and XT-1) as well as a Canon G15. Every time I go on a business trip, I throw in the G15 because you never know what interesting places and people will surface. 

Let's start with the gear. One of the best articles I read was this by Dave BouskillFor sure give his article a read as he has some excellent advice on gear. My challenge was that, I was hoping to travel a little lighter than he did. So here's what I ended up packing. 

Antarctica-35.jpg


Cameras

  1. A Canon 6D. Sure, I wish I could have afforded a 5D Mark 3 but I wanted to have some spending money in Buenos Aires after the Antarctic adventure.  It is a full frame camera, has GPS and is weather sealed - what more could you want. To fit on the 6D I brought two lenses -  the EF 24 - 105 and the EF 70 - 200 F4 IS. These lenses were both utilized greatly and I recommend them (or similar focal length) in a heartbeat.  The only disadvantage of having two lenses is that you have to switch them on an off - often in less than perfect conditions. I didn't find this to be too big of a deal since I typically had my Canon G15 with me for the shorter focal distances while using my 70-200 for the longer distances. The 24-105 rarely made it to shore but was greatly utilized on the ship. Among my fellow passengers, the 5D Mark 3 was probably the most common camera I saw. I also saw a number of travelers that had super zoom lenses - something like a 24 - 300 mm. These are good options but have some compromises that need to be considered such as weather proofing and barrel distortion. That said, if you bring only one lens, a super zoom might be a good option. 
  2. The Canon G15 with a 28-140 mm range and nice "bright" aperture of 1.8 to 2.8. It shoots RAW as well. I used this along with the underwater housing  to keep the camera nice and dry while kayaking as well as for Zodiac rides.  The housing also has easy to press buttons and dials making them relatively easy to manipulate with gloves on.
  3. The GoPro 3+ Black Edition. This this was pretty much attached to my head during all the shore excursions as well as the kayaking outings. The footage is stunning. I took primarily video but the stills give you a very wide angle - which works well when trying to capture the gorgeous scenery all around you. The beauty of this camera is that it is small and light - thus making it easy to pack and carry around with you. It only shoot's JPG - no RAW.
Antarctica 2013-32.jpg

Accessories:

  1. Overboard Adventure Backpack. I looked long and hard for the perfect camera bag but just couldn't find anything that fit the bill. Instead I decided to get a water resistant backpack with a internal camera unit (ICU) made by f-stop gear. It worked out great as often I would put the DSLR into a dry bag and into the backpack. Keep in mind, the bag I used is not waterproof but did a great job resisting the sea spray that will be inevitable on your Antarctic adventure. 
  2. I bought along my nice Benro carbon fiber tripod that could also serve as a monopod. Did I use it at all - No. Never made it out of the ship. Unless you are sure you're going to take some long exposure photography, my advice is to leave the tri-pod/monopod at home. You are going to be spending the bulk of your time hiking around  as your time on the shore is relatively limited. In addition, you are working in a generally bright, snowy environment. The last thing you need to worry about is a lack of light. 
  3. Joby GorillaPod - I did bring this small, versatile tripod for the GoPro and used it a few times. This was perfect in that it's lightweight, small and works with the GoPro and the Canon G15. 
  4. XShot Camera extender. A great tool for extending your GoPro for those selfies with you and the penguins. It's small and compact for travel.
  5. A Drybag. I can't recommend this enough. I picked up a 20 liter bag by Outdoor Research but anything near this size will do. This is critical. You will use this bag. I had my DSLR in it on each Zodiac ride because YOU WILL GET WET! Don't leave home without a dry bag and keep your camera in it.  On clear calm days, you may not need it but have one ready just in case. 
  6. OP/TECH Rainsleeve. This is nice to have in case it's snowing or sleeting. It's not a substitute for a dry bag but it's an easy item to toss into your camera bag.
  7. Extra Batteries - I had two for each device and that was sufficient. If you take thousands of photo's then you may want more but I made sure I was charging a battery each night whether it was drained or not. More on batteries preservation later.
  8. Extra storage - This will be highly subjective but for the Canon's, I brought 4,  16gig and 2 32gig SD cards. I shot RAW and JPG and had plenty of room to spare. For the GoPro, I had 2, 64gig MicroSD cards. Again, I had no issues with capacity. I also brought along a USB stick so that I could exchange photos and video with fellow passengers.
  9. A Laptop - I didn't bring one but lots of passengers did. In a way, I wish I would have brought my MacBook Air but in an effort to travel light, I left it at home. My advice - bring it if you have room and a good enough back. 
Antarctica 2013-13.jpg

Camera Settings

We were fortunate in that we had a resident photographer Simon Bottomley, on our trip (This is a benefit of Quark Expeditions). It was nice as he was able to give passengers advice on the best settings for the bright snow as well as the dark rocky outcroppings where the penguins build their stone nests - yes, that's what they are made of.  He also was able to get amateurs past the "Auto" setting and on to more advanced functions like Aperture Priority or Shutter Priority. I tend to shoot Aperture Priority most of the time. The simple thing to keep in mind is that when you are photographing subjects on snow and ice, it's best to dial your EV Setting +1 to +2. Alternatively, when photographing something dark like the rocky nests, it's best to dial your EV Setting down to -1 or -2.  

Preserving your Batteries

As i indicated earlier, I recommend bringing at least 2 batteries per device. I brought two and never had a need for a third. Of course it's important to know that cold weather can be a battery power sucker. As such, keep the extra battery in your inside pocket where it's right next to your body. While camping, I actually put the batteries in a cloth case and stuck them in my sleeping bag with me. 

Keeping your Camera Dry

As I said before, bring a dry bag. Not only will it keep your camera dry during the zodiac ride but it will help your camera adjust from one extreme temperature to another. For instance, if you go from the cold outdoors to the warm interior of ship cabin, you run the risk of developing fog on the interior of your camera or lens. To combat this, simply keep the camera in the dry bag and leave it there for an hour or so. This will allow any condensation to form on the exterior of the dry bag rather than on (or worse - inside) your camera. 

RAW vs. JPG

My advice here is pretty simple - shoot RAW. This allows the camera to take in more scene information so that you can adjust later in a photo editing software like Adobe Lightroom or Apple Aperture. Our ship had a photo contest and took submissions only in JPG so I adjusted my camera to shoot both RAW and JPG. I might recommend this as well since this will give you pictures to exchange and share immediately while at the same time allow you to edit them in the future from the RAW file. 

Take a lot of Pictures (but not too many)

One thing that I can't stress enough is to put your camera down every now and then and enjoy the experience. Smell the smells (there is nothing like the smell of whale spout or penguin guano). Listen to the birds and the rumblings of distant glaciers. In looking at my photo's now, I keep thinking to myself - "this barely captured the scene". Plan your shots rather than photographing everything scattershot. You'll thank yourself when you come home and only have a few thousand shots to edit rather than tens of thousands.

Conclusion

Your trip to Antarctica will be the trip of a lifetime. If you benefited by one bit of advice then I have done my job. Safe travels and when you return, send me a link to your photos! Safe travels!

Antarctica 2013-55.jpg